Azure Student Servers: Claim $100 and Create a Japan VPS with the Portal or CLI
Jump to comments ↓Azure is near the top of my student benefits list: $100 a year, no credit card, and free allowances for small VMs and two OS disks during the first 12 months. A nice place for personal projects
I’d start in Japan with Ubuntu, get SSH working, then put something useful on it. This post takes you as far as a running server; application deployment can come next
The benefits and prices below were checked on October 17, 2026. Pick either the portal or CLI method
The step-by-step images follow Microsoft’s interface, with identifying details replaced
Claim Azure for Students
You need to be at least 18, enrolled full-time at an eligible university, and have a Microsoft account and a university email that receives messages
Route one: through the GitHub Student Pack
If you’ve passed GitHub Education verification, open the GitHub Student Developer Pack, find Microsoft Azure, follow its redemption link, and sign in with your Microsoft account
Check that the offer is Azure for Students, $100, 12 months. Azure for Students Starter is a different offer for younger students
If academic verification asks you to choose a method, select GitHub and follow the authorization steps
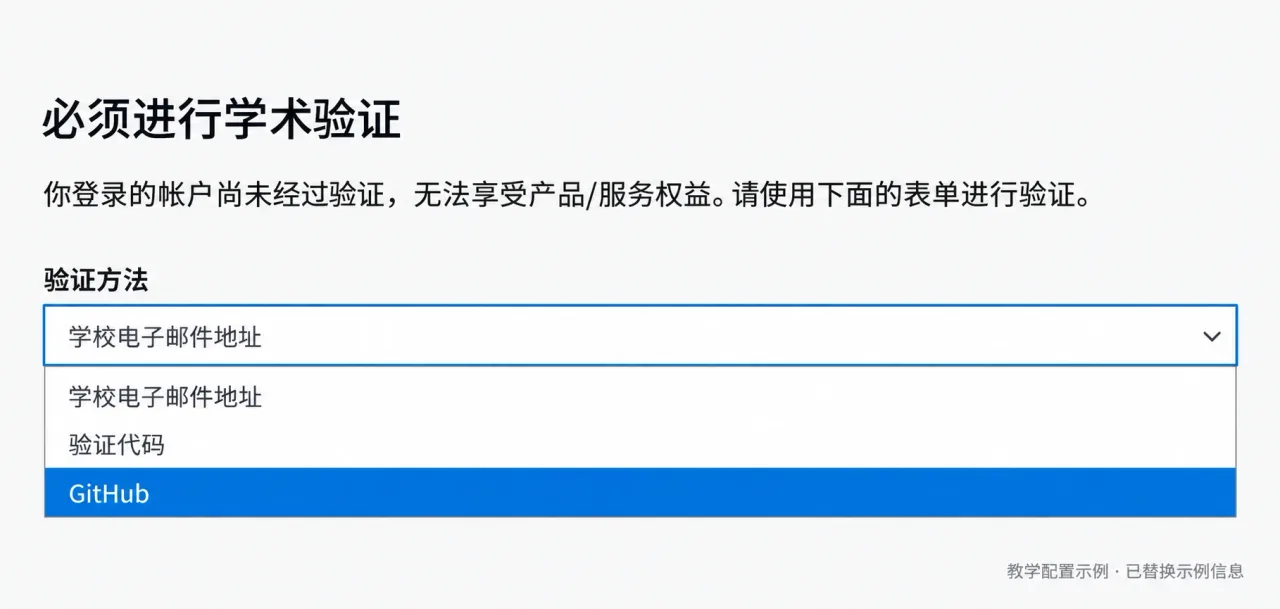
Route two: verify your university email
Open Azure for Students, sign in, and enter your university and university email
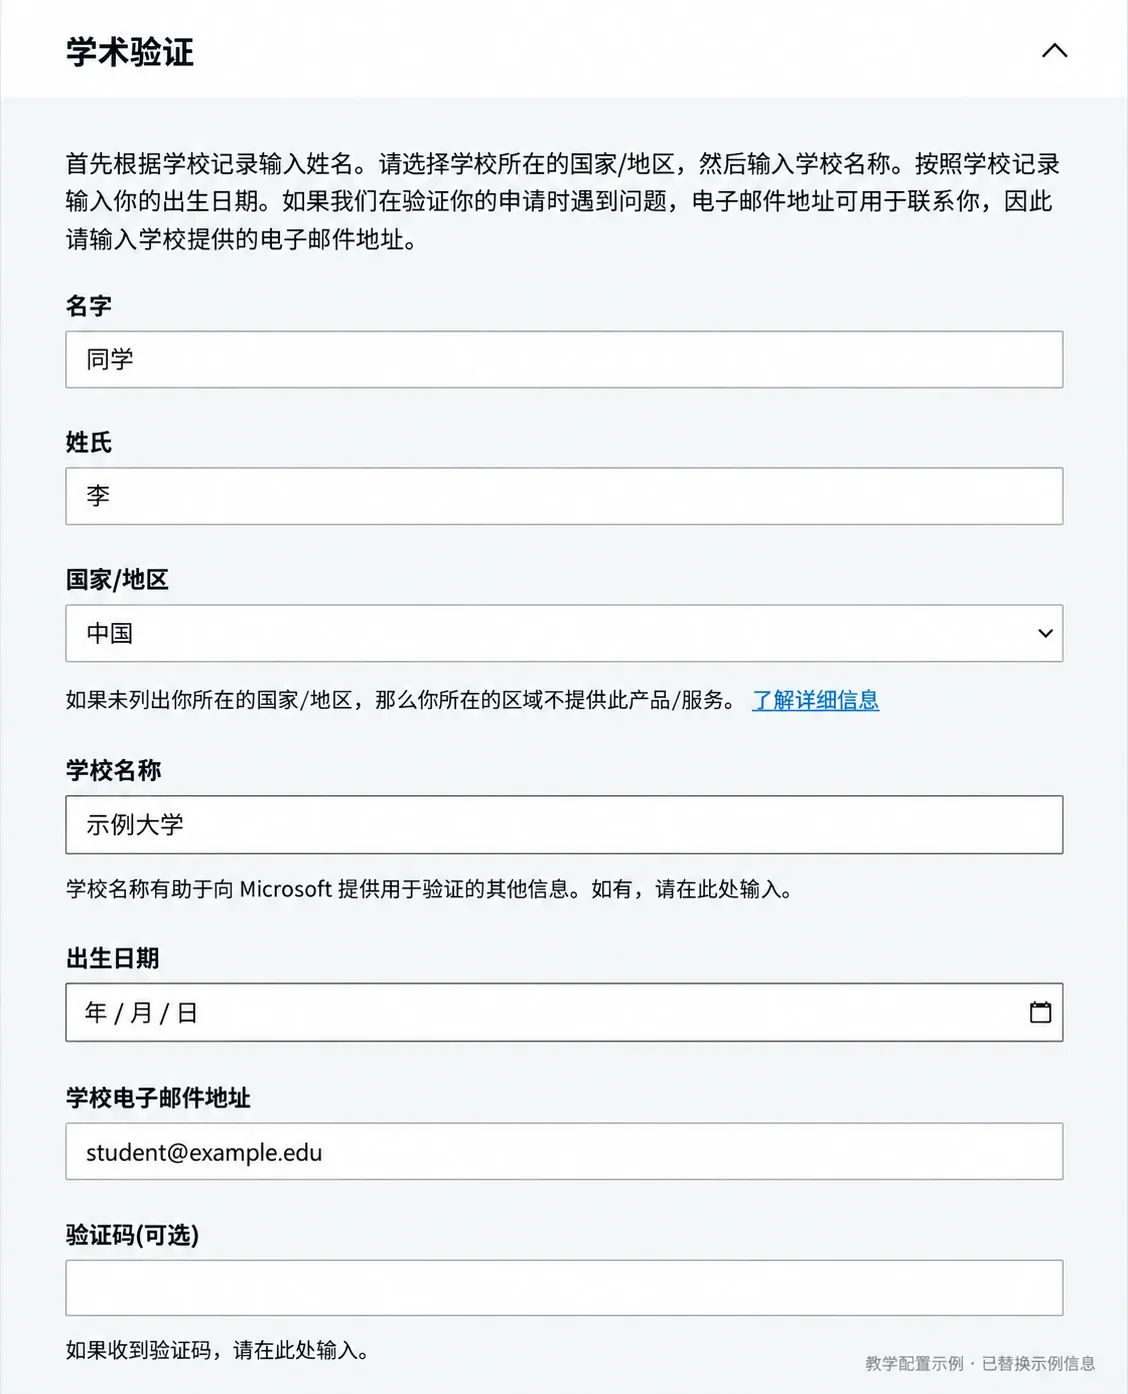
[email protected] is an example. Enter your real details and your university’s actual country. That choice is separate from selecting Japan for the server
When the academic verification email arrives, follow its link, then finish the application. The email gives the link’s expiry; request a fresh one if needed
Receiving the verification email isn’t the final step. Open Subscriptions in the Azure portal, confirm Azure for Students is listed, and check the balance and expiry
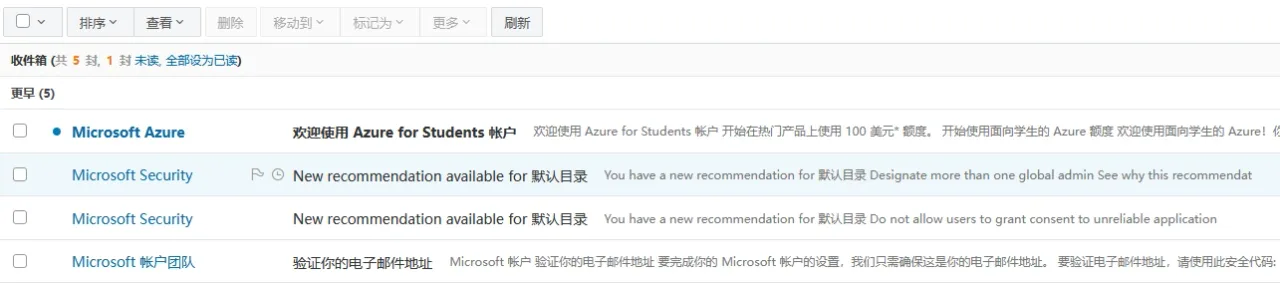
Both routes redeem the same benefit. If the email route gets stuck, try entering through the Student Pack
What is free
Two separate things: the $100 credit lasts 12 months and eligible students can renew yearly; the new-customer 12-month resource allowances do not restart with that renewal
| Item | Free allowance | Choice in this guide |
|---|---|---|
Standard_B2ats_v2 | 750 hours/month for new customers during the first 12 months | x64, first choice |
Standard_B2pts_v2 | 750 hours/month for new customers during the first 12 months | Arm64, useful for a second experiment |
Standard_B1s | The student page still lists 750 hours/month | Check your Free Services page and regional availability |
| Managed OS disks | Two 64 GiB P6 Premium SSD LRS disks during the first 12 months | Premium_LRS, one per VM |
| Internet outbound traffic | First 100 GB/month | Shared by your machines, not 100 GB per VM |
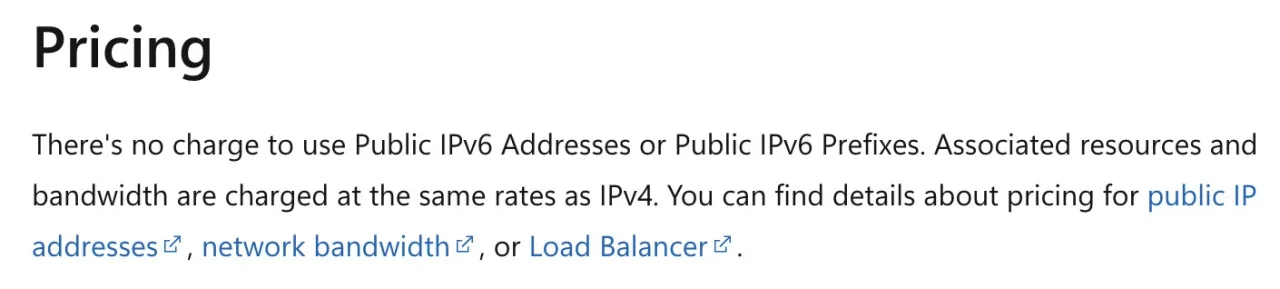
| Public IPv6 address | No address fee | Outbound data is still metered |
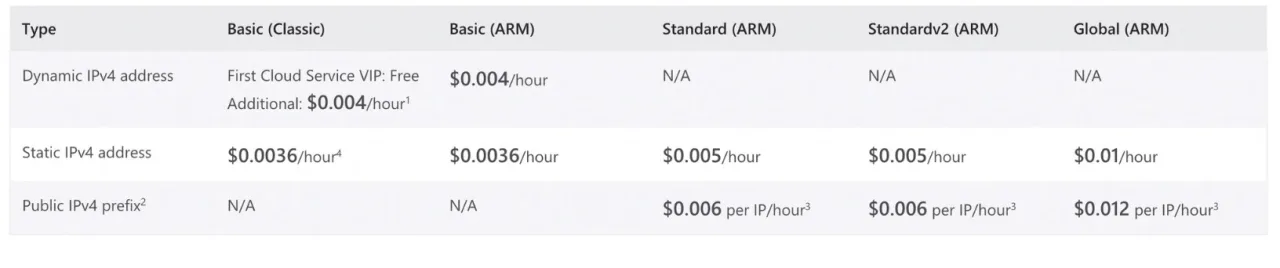
| Standard public IPv4 | Outside the free address allowance used here | About $0.005/hour in Japan |
Each eligible VM size has its own 750-hour allowance. That’s enough for one VM of each size to run all month. Two VMs of the same size share that size’s hours, so a B2ats_v2 plus a B2pts_v2 is an option for two machines
One easy detail to miss: the free disks are two P6 Premium SSD LRS disks, 64 GiB each

Look for Linux Virtual Machines, Azure Disk Storage, and the 100 GB outbound allowance. The bandwidth budgets below use that monthly 100 GB tier
Check Subscriptions → Azure for Students → Free services before creating resources. Once usage appears, confirm VM hours and disks are counted against those allowances
I’d choose Japan first
Start by checking where your subscription can deploy. In the Azure portal, search for Policy, open Assignments, and set the scope to your Azure for Students subscription
Open Allowed resource deployment regions, then Parameters, and read Allowed locations. This usually lists the five regions assigned to your subscription
Mine showed:
["centralindia","indiasouthcentral","uaenorth","malaysiawest","japaneast"]The list varies between accounts. Mine includes Japan East, so I chose japaneast
For readers connecting from mainland China, my order is Japan → Singapore → India → Hong Kong. The US isn’t a routine alternative here; work through the regions your policy allows
| Region | CLI name | My choice |
|---|---|---|
| Japan | japaneast / japanwest | First choice, with Japan East preferred |
| Singapore | southeastasia | Try if Japan is unavailable |
| India | centralindia / indiasouthcentral, among others | Choose an Indian region listed in your policy |
| Hong Kong | eastasia | Last choice; read the AI service restriction below |
Hong Kong is currently absent from the official supported-region lists for ChatGPT and Claude. For those services, choose Japan, Singapore, or India from your allowed regions
After checking the allowed list, inspect sizes and quotas. A region appearing in the VM wizard doesn’t mean your student subscription can deploy there
For RequestDisallowedByAzure, read the region policy in the error. For unavailable sizes or exhausted regional capacity, try another allowed region. Changing zones alone won’t bypass a region policy
Portal method: create the VM
Basics and OS disk
Open Virtual machines → Create → Azure virtual machine, then use:
| Setting | Value |
|---|---|
| Subscription | Azure for Students |
| Resource group | Create rg-student-jp |
| VM name | student-jp |
| Region | Japan East |
| Availability options | No infrastructure redundancy for this starter setup; choose a zone if you need one |
| Image | Ubuntu Server 24.04 LTS, x64 Gen2 |
| Security type | Standard |
| Size | Standard_B2ats_v2 |
| Authentication | SSH public key |
| Username | student |
| Public inbound ports | SSH 22 only |
| OS disk type | Premium SSD LRS |
| OS disk size | 64 GiB, P6 |
| Data disks | None |
Choose the subscription, resource group, and region first. Create rg-student-jp; the public IPs and network interface will belong to it too
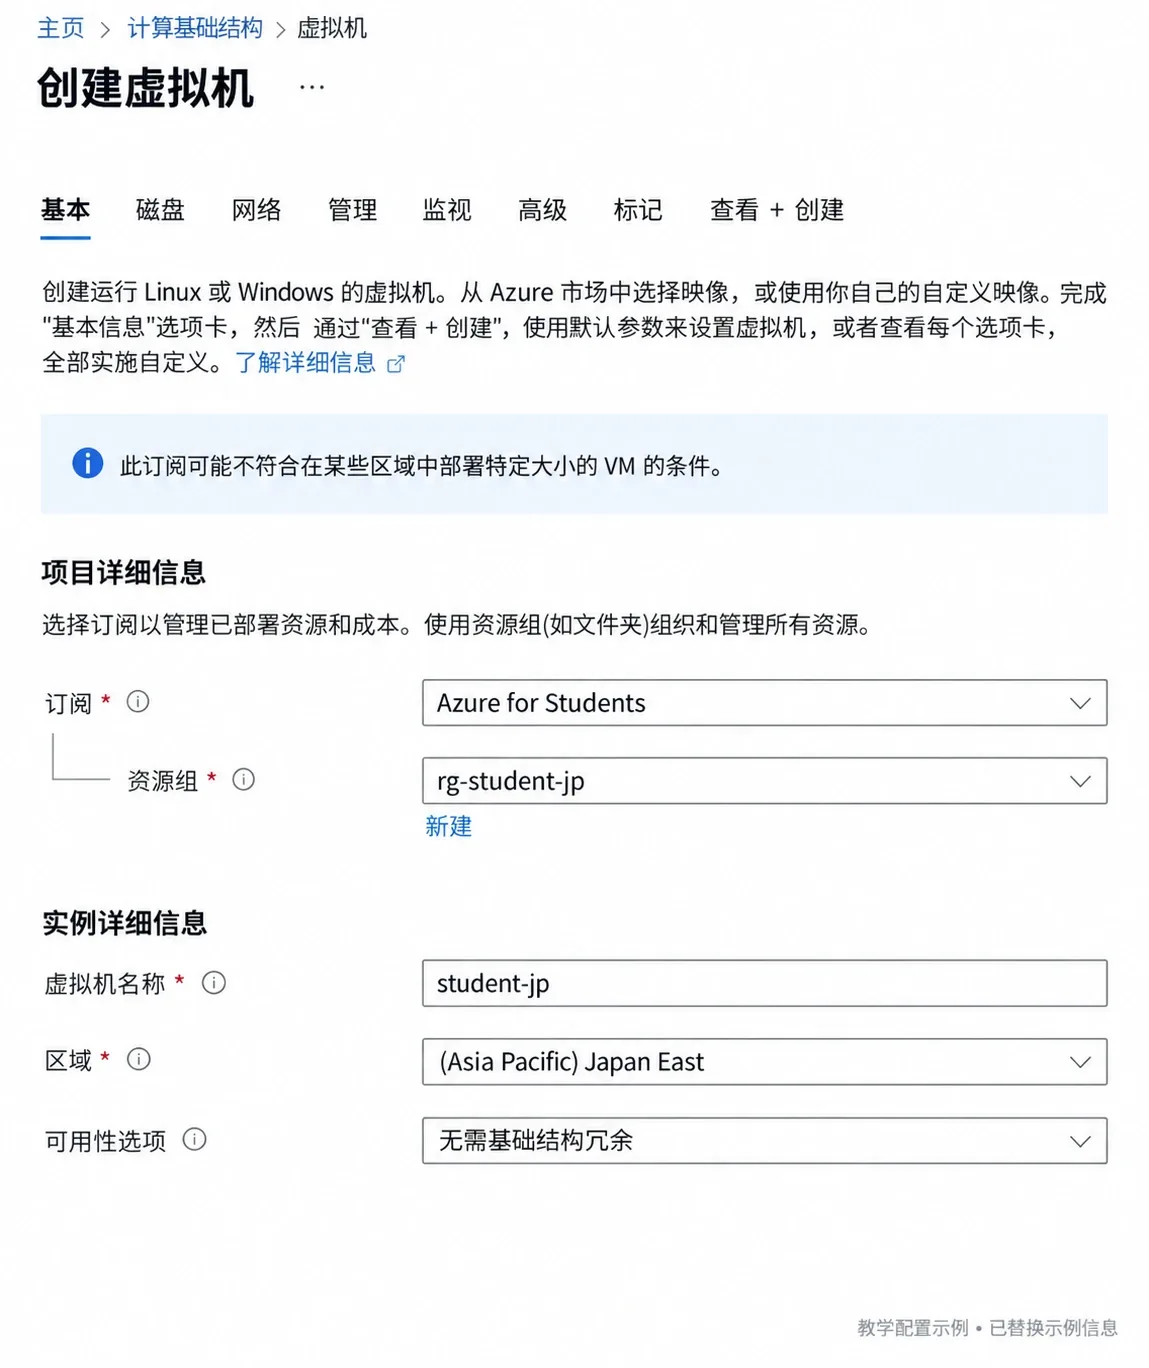
Then select the image and size. B2ats_v2 uses x64. Choose SSH public key authentication and the username student
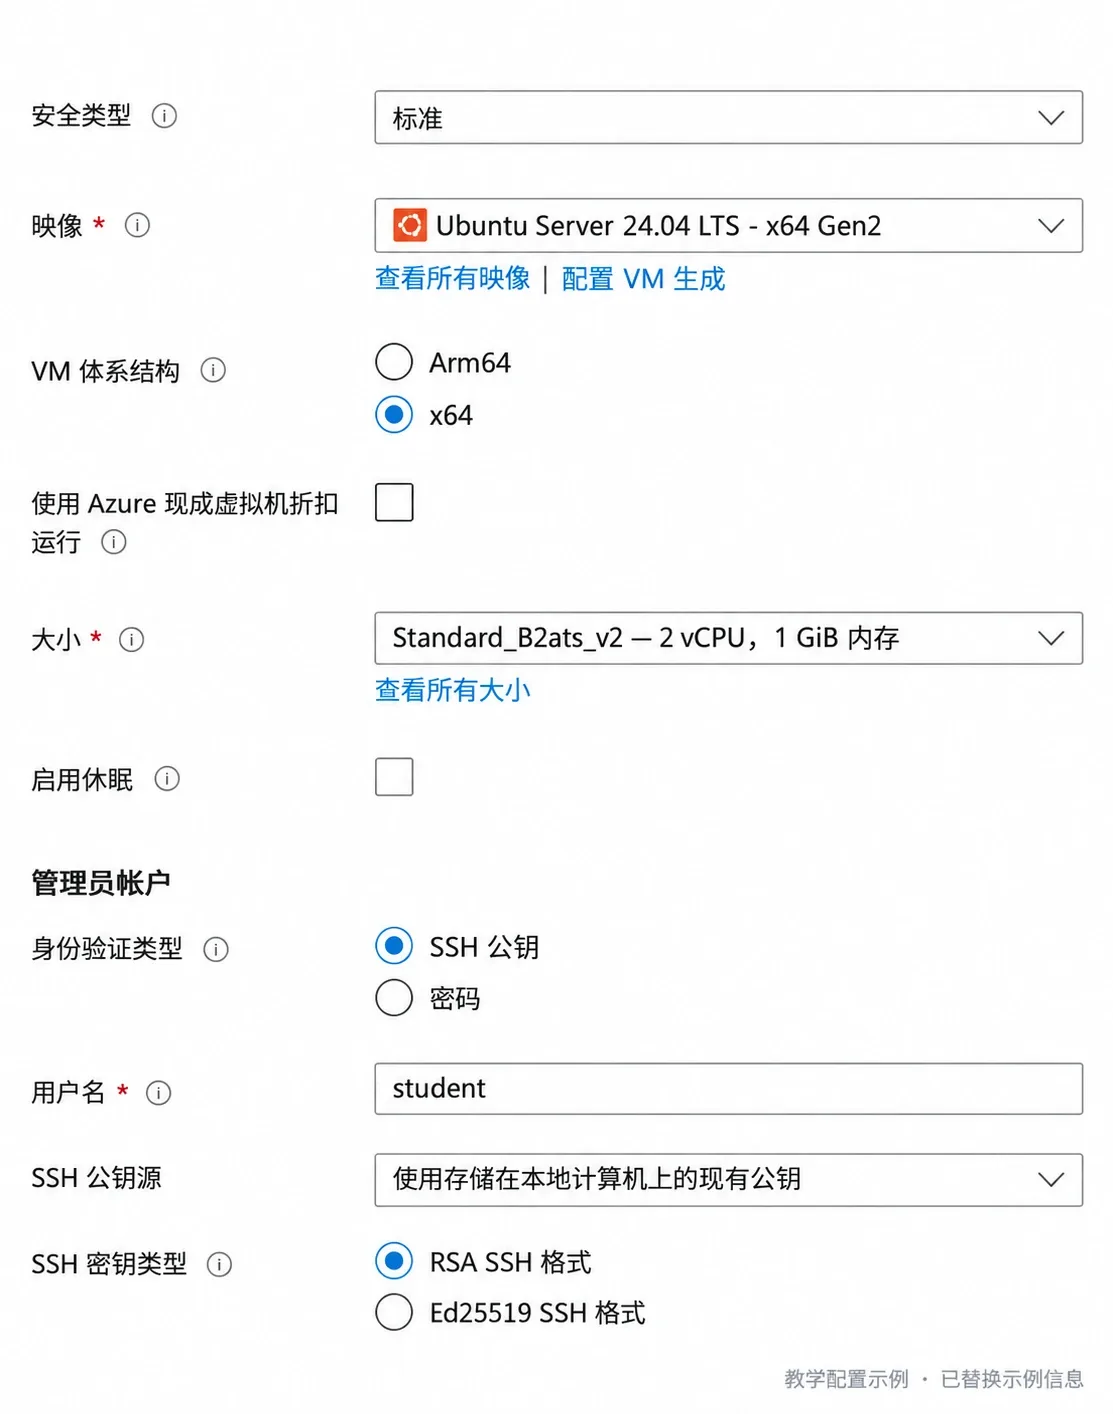
If the portal generates your SSH key, download and keep the private key. You can also supply an existing public key
Premium SSD v2 and Premium SSD LRS are different options. Confirm P6 and 64 GiB again on the Disks tab
Network choices
For a first VM, I’d buy one Standard public IPv4 and add IPv6 later. SSH works from most networks, and installing software is simpler
If creating an IP from the VM wizard is awkward, search for Public IP addresses in the portal. Create student-jp-ip4 in the same resource group and Japan East, choose IPv4 and Standard, then select it in the VM’s network settings
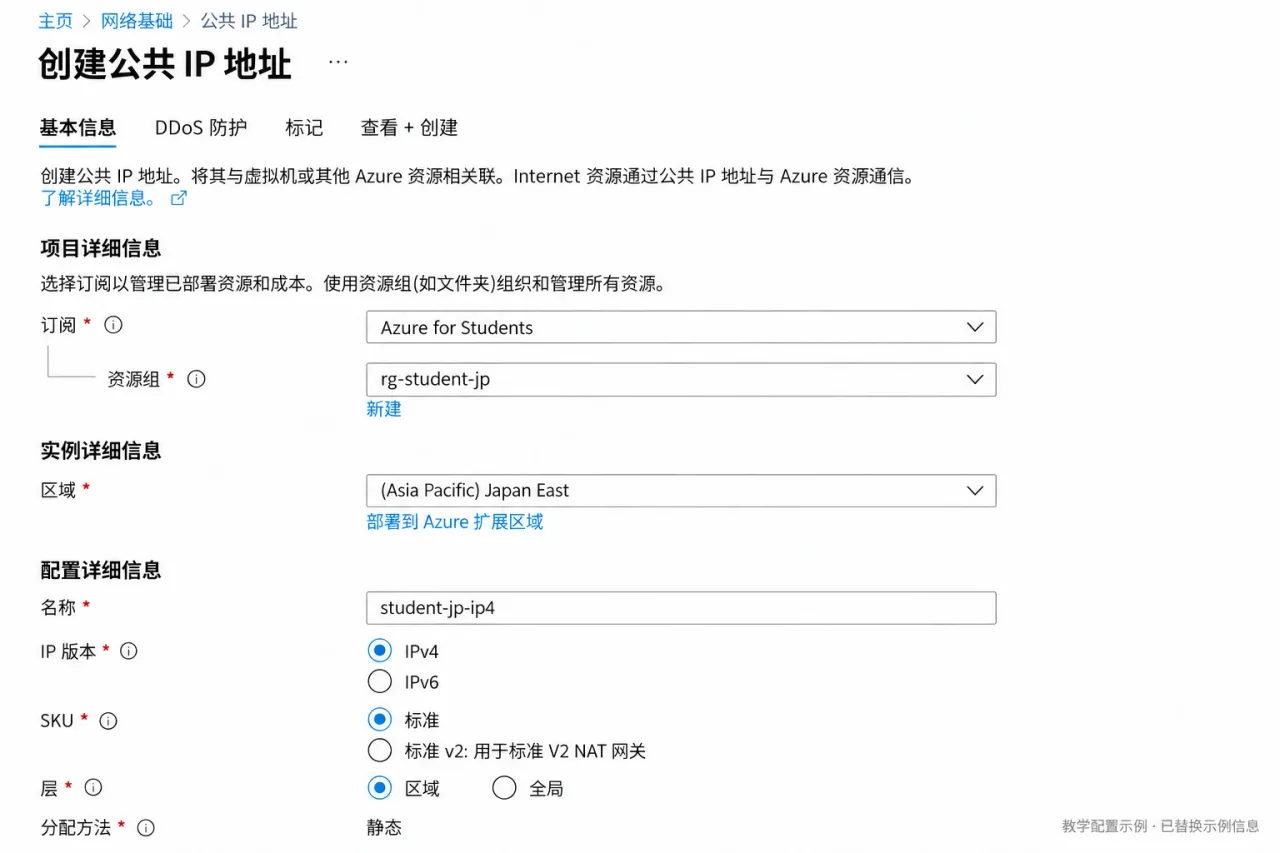
If your own internet connection supports IPv6, you can choose None for public IPv4 and add IPv6 after creation:
- Add
fd12:3456:789a::/48to the VM’s VNet address space - Add
fd12:3456:789a:1::/64to its subnet; Azure IPv6 subnets use/64 - Create a Standard public IP in the same region, choosing IPv6 and Static
- Open the network interface’s IP configurations, add an IPv6 configuration, and select that subnet and public IPv6
- Keep the private IPv4 configuration and allow TCP 22 in the network security group
Step 3 looks similar to IPv4 creation. Use student-jp-ip6, choose IPv6, and keep the Standard SKU rather than Standard v2 with NAT Gateway
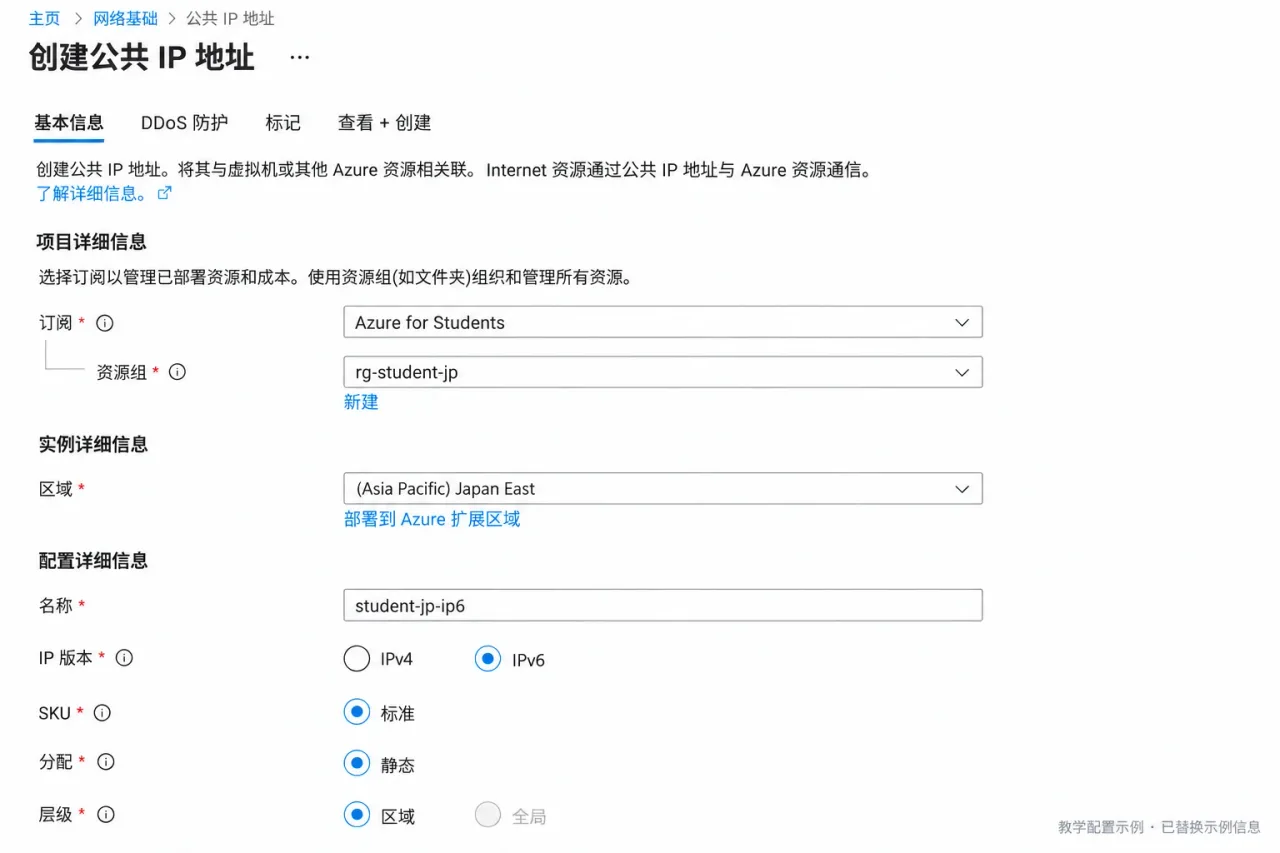
“IPv6-only” here means no purchased public IPv4. Azure’s VM interface still keeps its private IPv4 configuration
Leave backups, extra monitoring, and paid add-ons out of this starter setup. Review the resources under Review + create. The portal’s VM list price needs to be read alongside your Free Services allowances
Connect to the server
With public IPv4:
ssh -i "$HOME\.ssh\azure-student" student@YOUR_PUBLIC_IPV4With only public IPv6:
ssh -6 -i "$HOME\.ssh\azure-student" student@YOUR_PUBLIC_IPV6Replace $HOME\.ssh\azure-student with your private key’s location. Find the address on the VM’s networking page
CLI method: create with commands
Use PowerShell 7.4 or newer on Windows. Your SSH private key stays on your computer
Install, sign in, and inspect
Follow Microsoft’s Windows installation guide. Skip the relevant install command if already installed:
winget install --exact --id Microsoft.AzureCLIwinget install --exact --id Microsoft.PowerShellReopen PowerShell 7 after installation. Run the remaining commands in that window. Set failed commands to stop execution, then sign in and select the subscription:
$ErrorActionPreference = 'Stop'$PSNativeCommandUseErrorActionPreference = $true
az loginaz account list -o tableaz account set --subscription 'YOUR_AZURE_FOR_STUDENTS_SUBSCRIPTION_ID'Set these variables. $publicIpv4 = $true buys a public IPv4; $false creates only public IPv6. Both keep a dual-stack private network
$region = 'japaneast'$group = 'rg-student-jp'$vm = 'student-jp'$size = 'Standard_B2ats_v2'$image = 'Canonical:ubuntu-24_04-lts:server:latest'$publicIpv4 = $true
az policy assignment list -o jsoncaz vm list-usage --location $region -o tableaz vm list-skus --location $region --size $size ` --resource-type virtualMachines --all ` --query '[].{SKU:name,Restrictions:restrictions,Zones:locationInfo[0].zones}' -o jsoncaz vm image show --location $region --urn $image -o tableRead the allowed regions, remaining regional and VM-family vCPUs, then Restrictions. Zones describes zone support, not guaranteed capacity. Check free eligibility in the subscription’s Free Services page
For B2pts_v2, change $size to 'Standard_B2pts_v2' and $image to 'Canonical:ubuntu-24_04-lts:server-arm64:latest'
Create the network and addresses
Continue in the same PowerShell 7 window. A backtick continues a command onto the next line; place the line break directly after it
New-Item -ItemType Directory -Path "$HOME\.ssh" -Force | Out-Nullssh-keygen -t ed25519 -f "$HOME\.ssh\azure-student" -C azure-student
az group create --name $group --location $region
az network vnet create -g $group -n vnet-student -l $region ` --address-prefixes 10.20.0.0/16 fd12:3456:789a::/48 ` --subnet-name snet-student ` --subnet-prefixes 10.20.1.0/24 fd12:3456:789a:1::/64
az network nsg create -g $group -n nsg-student -l $regionaz network nsg rule create -g $group --nsg-name nsg-student ` -n allow-ssh --priority 1000 --direction Inbound --access Allow ` --protocol Tcp --source-address-prefixes Internet ` --source-port-ranges '*' --destination-address-prefixes '*' ` --destination-port-ranges 22
az network public-ip create -g $group -n "${vm}-ip6" -l $region ` --sku Standard --version IPv6 --allocation-method Static
az network nic create -g $group -n "${vm}-nic" -l $region ` --vnet-name vnet-student --subnet snet-student ` --network-security-group nsg-student
az network nic ip-config create -g $group --nic-name "${vm}-nic" ` -n ipconfig6 --private-ip-address-version IPv6 ` --vnet-name vnet-student --subnet snet-student ` --public-ip-address "${vm}-ip6"
if ($publicIpv4) { az network public-ip create -g $group -n "${vm}-ip4" -l $region ` --sku Standard --version IPv4 --allocation-method Static az network nic ip-config update -g $group --nic-name "${vm}-nic" ` -n ipconfig1 --public-ip-address "${vm}-ip4"}If ssh-keygen asks to overwrite an existing key, keep it and choose a new filename. Update the public key path in the next command to match
Create the VM and check the disk
az vm create -g $group -n $vm -l $region ` --size $size --image $image --security-type Standard ` --admin-username student --authentication-type ssh ` --ssh-key-values "$HOME\.ssh\azure-student.pub" ` --nics "${vm}-nic" --os-disk-name "${vm}-os" ` --storage-sku Premium_LRS --os-disk-size-gb 64
az vm get-instance-view -g $group -n $vm ` --query 'instanceView.statuses[].displayStatus' -o tsvaz disk show -g $group -n "${vm}-os" ` --query '{Disk:name,Storage:sku.name,GiB:diskSizeGb,Tier:tier}' -o tableaz network public-ip list -g $group ` --query '[].{Name:name,Version:publicIPAddressVersion,Address:ipAddress}' -o tableExpect Premium_LRS, 64 GiB, and P6. Use the printed public address with the SSH commands above. These commands leave the availability zone unspecified to keep the starter setup flexible about capacity
Let an AI assistant help
Send this paragraph to an assistant that can use your local terminal. Complete Microsoft sign-in and verification codes yourself
Use PowerShell 7 to install Azure CLI and sign me into Azure for Students. Check allowed regions, quotas, and free services; try Japan, Singapore, India, then Hong Kong, and show costs for my confirmation. Then create one B2ats_v2 VM with Ubuntu 24.04 LTS x64 Gen2, a 64 GiB P6 Premium_LRS disk, dual-stack networking, public IPv4 and IPv6, SSH key authentication, and TCP 22. Verify SSH and give me the addresses, connection command, and resource listFor IPv6 only, change the public address plan to “Standard public IPv6 with dual-stack private networking.” With a chat-only AI, ask it for PowerShell commands to run yourself
Is public IPv4 worth buying
Choose IPv4 for convenience; use only public IPv6 to save the address fee if the connectivity trade-off works for you
IPv6 addresses are free, but outbound traffic is metered. Your connecting network needs IPv6 too, and IPv4-only websites or package registries may be unreachable from the server
SSH into Ubuntu first, then run these commands in the server’s Bash shell to inspect IPv6 addresses and routes and try the services you’ll use:
ip -6 addr show scope globalip -6 routecurl -6 -I https://www.microsoft.com/sudo apt updatecurl -I https://github.com/curl -I https://registry-1.docker.io/v2/A Docker Registry 401 Unauthorized usually means the service is reachable and wants authentication. If GitHub or a package source fails, check that service’s IPv6 support before deciding how to provide IPv4 connectivity
How much monthly bandwidth
Internet inbound traffic is free; the first 100 GB outbound each month is free. These estimates use Microsoft’s default global network routing: $0.12/GB beyond the allowance in Japan, Singapore, India, and Hong Kong
A Standard public IPv4 in these regions costs $0.005/hour. At 730 hours/month that’s about $3.65/month, or $43.80/year. Public IPv6 has no address fee
Spread the $100 across 12 months and you have about $8.33/month. If VM compute and the first two P6 disks fit the free allowances, with no other charges:
| Region and public addresses | Address fee/month | Extra outbound covered by credit/month | Including the free 100 GB |
|---|---|---|---|
| Japan / Singapore / India / Hong Kong, one IPv4, optionally IPv6 too | About $3.65 | About 39 GB | About 139 GB/month |
| Japan / Singapore / India / Hong Kong, public IPv6 only | $0 | About 69 GB | About 169 GB/month |
The formula is simple:
Monthly outbound GB= 100 + (100 / 12 - monthly IPv4 fee - other monthly costs) / outbound price per GBThis is the combined budget for the setup. Each VM does not get another 100 GB and another $100. Two VMs sharing one purchased IPv4 still total about 139 GB/month in Japan; two IPv4 addresses cost about $7.30/month, leaving much less credit for data
The $100 arrives as a one-year balance, not a fresh $8.33 each month. The free 100 GB resets monthly and doesn’t roll over. Inter-region traffic and other services have separate charges
Cleaning up
Use Free services to check resource allowances and Cost Management for IPv4 and extra outbound charges. Keep track of the student credit balance and expiry too
Eligible students can renew the $100 yearly. After the first 12 months, add VM and disk charges back into your budget. Unused old credit does not carry over
When finished, save your data and delete the dedicated practice resource group. This removes its VMs, disks, interfaces, and public IPs together:
az group delete --name rg-student-jpStopping the VM alone leaves disks and reserved static IPv4 addresses in place. That’s why I prefer keeping this setup in one resource group: cleanup is much simpler
References
- Azure for Students: credit, renewal, and free VMs
- Azure for Students eligibility and credit terms
- GitHub Student Developer Pack
- Azure free services
- Microsoft Q&A: find the five allowed deployment regions
- Microsoft community explanation of two free 64 GiB P6 disks
- Public IP pricing
- Official Japan public IP retail pricing API
- Outbound bandwidth pricing
- Azure IPv6: pricing, dual-stack interfaces, and subnet limits
- Default outbound access and new private subnets
- Install Azure CLI on Windows
- Use Azure CLI in PowerShell
- Interactive sign-in and subscription selection
Read next
Other official offers are in the student benefits hub. Compare the Aliyun student voucher if you’re choosing a server
Once the VM is ready, continue with Docker basics and the small-server service guide. Pick ntfy notifications or a Vaultwarden password vault, then connect a domain and HTTPS using Cloudflare